keskiviikko 23. kesäkuuta 2010

LED patterns made easy (and detailed too)

Maybe the most popular "advanced" (need root access or download and use a non-trivial app, risk of bricking the device) configuration task for the N900 is modifying the status LED patterns.

N900 has an RGB LED component whose red, green and blue LEDs can be controlled separately. For programming, there are two LED engines that can be attached to one or more LEDs (one LED can't be attached to two engines however) and run their own programs to get more colorful effects.

HC programmers whose middle name is "D4nger" will enable root access, cd to /etc/mce and vi mce.ini, calculating the hex numbers in their heads. The rest might be more comfortable with downloading "LED Pattern Editor" from the Maemo Extras repository.

After installing, you should find "LED Patterns" in the Personalisation section of the Control Panel. After starting that, you'll see a list of the current patterns visually shown by the Pattern Editor.

Hit one of the existing patterns to edit it, you can start from the "Example" pattern that won't really affect anything.

When you open a pattern, you will see the pattern graphically displayed, as well as the program steps used for the pattern. Program steps can be edited or deleted by touching them, new entries can be added with the "New command" entry in the end of the list. The different commands that can be added are:

LED pattern commands


Set PWM
Set the LED brightness value to a level between 0 and 255; 0 would be black and 255 full brightness. The brightness will stay that way until another command changes it.

Ramp
A ramp gradually slides brightness up/down over time.
For a ramp you can define:
* Milliseconds per step
* If brightness is increased (+) or decreased (-) on each step
* Number of steps
The default is the shortest full ramp, 255 steps of 0.49 ms, direction alternating between + and -. The time taken by the ramp is step time * number of steps, this
default ramp would thus take 255*0.49 ms ~ 124.51 ms ~ 1/8 of a second.

Ramps can also be used as long waits, brightness is not adjusted if you create a "minus" ramp when brightness is already zero, or a "plus" ramp when brightness is 255. Slowly changing brightness can't be noticed, you could for example set PWM to 64 and then create a minus ramp of four 250ms steps for a one second wait without any perceivable change in the brightness.

Wait
Defines the time of how long to wait, 0.49-484.38 ms, until continuing processing commands. See below for possible values. The interface is shared with Ramp; leave step count to zero and adjust the duration lever.

Trigger
Create a trigger or from another engine or wait for a trigger for another engine. Only useful if both LED engines are used in the program, trigger can be used to synchronize them.

Go To Start
Jump to the beginning of the program and continue. Ends looping programs.

End
End the program here. Ends non-looping programs.

Normally you would start programs with a Set PWM command to set brightness to the desired levels and end using a "Go To Start" or "End", depending on if you want it looping or not. Between those create "Set PWM"'s, Ramps and Waits to create the pattern you wish.

Wait times


Wait times can be adjusted by 0.49 ms (or 1000 ms/2048 to be exact) steps when the wait time is between 0.49-15.62 ms, and by 15.63 ms (1000 ms/64) steps when the wait time is between 15.62-484.38 ms. Thus, the possible values in ms are:

0.494.398.312.2131.25156.25281.25406.25
0.984.888.7912.746.88171.88296.88421.88
1.465.379.2813.1862.5187.5312.5437.5
1.955.869.7713.6778.12203.12328.12453.12
2.446.3510.2514.1693.75218.75343.75468.75
2.936.8410.7414.65109.38234.38359.38484.38
3.427.3211.2315.14125250375
3.917.8111.7215.62140.62265.62390.62

Thus, to get a wait of exactly one second, you could use for example four 250ms waits, or two 375's and one 250.

As the steps are 1000/2028 ms, some "exact" values would be:

FractionWait timeFractionWait time
1/2048 s0.49 ms1/64 s15.62 ms
1/1024 s0.98 ms1/32 s31.25 ms
1/512 s1.96 ms1/16 s62.5 ms
1/256 s3.92 ms1/8 s125 ms
1/128 s7.84 ms1/4 s250 ms

These can be used with the ramps, for example a ramp of 128 7.84 ms steps would take exactly one second. The default ramp of 255 0.49 ms steps takes 1/8 of second (minus 0.49 ms as we can't choose "256"), so a 0-255-0 would take 1/4 of a second. To pad a 0-255-0 pulse to one second, you'd need to add another 3/4 seconds which could be achieved simply by adding a "minus" ramp with three 250ms steps (or two 375's).


Much more information at maemo.org.

maanantai 21. kesäkuuta 2010

Flashing when N900 gets into reboot loop

Maemo is full enough Linux to gladly offer all the rope needed for hanging yourself, no stupid questions like "do you really want to change the file extension" or "are you sure you want to delete every file in the system" when you just got the rights to do that.

Thus, when entering the root mode, you should already be prepared for non-trivial problems, including losing your data and/or having to live without your device [working] until you fix it. The most common failure with Maemo devices is the reboot loop. When starting, it vibrates momentarily, shows the Nokia logo, then the row of five blinking circles. After that is blanks, vibrates, shows the Nokia logo and the circle row, on and on, forever (or as long as your battery lasts, whichever comes first). In this state you can't even charge as it will never be up long enough to charge.

Fortunately, everything is not lost, you should be able to just re-flash the OS partition and lose only some configuration (depending if you had those backed up or not) and might need to re-install applications. If the firmware re-flashing doesn't help, you might need flashing the eMMC (internal flash drive) which will lose all your data stored in the internal flash drive.

Anyway, here is what to do when the reboot loop occurs:

0. Remove battery ASAP and get everything ready. You'll need a pretty full battery and the N900 won't charge it in this stage.
1. Get Flasher 3.5 from http://tablets-dev.nokia.com/maemo-dev-env-downloads.php
2. Have ready the firmware file installed in the N900 or get the default one (latest global Maemo 5) from http://tablets-dev.nokia.com/nokia_N900.php Also get the latest/used eMMC file from there if don't have one.
3. Remove battery
4. Press "u" and keep pressed
5. Insert battery
6. Nokia-logo appears, no backlight. USB-logo appears, release "u".
7. Plug USB-cable to PC.
8. The internal flash might now be mounted to the PC, back-up if yes.
9. Command prompt, "flash-3.5.exe -F -f <OS-file>"
10. Should flash, when ready and nothing happens remove USB cable and it will reboot
11. If doesn't want to flash, fully recharge battery with another N900 or whatever device with the same battery or a N810
12. If still not flashing, try flashing with "--enable-rd-mode", then with "--disable-rd-mode"
13. Hopefully works now and most of stuff is still intact. If still goes into the reboot loop, flash the eMMC file similarly and try again.

After this, you will have empty desktops and no installed applications to be found. Start Application Manager and do update, it _might_ re-install the apps so that they can be found again. Haven't seen that happening so have been re-installing the apps.

To install all the apps, you can either use the GUI App Manager, scroll around the list and wait forever between each installation, or use apt-get on the command line. To install several apps, you might want to write a simple script that does it, either each app on its own line or all of them with a single apt-get call.

apt-get install -y rootsh
apt-get install -y openssh
apt-get install -y leafpad
apt-get install -y coreutils-gnu

or just

apt-get install -y rootsh openssh leafpad coreutils-gnu

These have to be run as root.

To restore desktops, you would have needed to store them with Desktop Activity Manager first:
1. Install Desktop Activity Manager
2. Touch the status menu at any screen
3. Touch "Desktop Activity"
4. Hit "New" (just to be sure, DAM stores the existing desktop configuration as "Default" at installation or startup anyway)
5. Give it a name
6. OK, close DAM
7. The activities are stored in /home/user/.activities/activities, back them up somewhere now and then to be sure you got them when needed.

perjantai 18. kesäkuuta 2010

E-mail sync at low load

N900's default e-mail client Modest is a pretty heavy app when doing syncing, not nice if you're in the middle of trying to get something done. Luckily about anything can be scripted in the N900 so here's a script that syncs only when CPU load below the defined level. It also stores the time of last (try of) syncing and syncs only if a defined time has passed.

Run this every 1 minute (or whatever) with Alarmed. Seems to sync all e-mail accounts.


#!/bin/sh

secsbetween=600 #Only run if 10 minutes has passed since last update
maxload=40 #Only run if 5 min average load less than 0.40

if [ -s /tmp/prevmail.tmp ]
then prev=`cat /tmp/prevmail.tmp`
else prev=0
fi
cur=`date +%s`
if [ $(( $cur - $secsbetween)) -gt $prev ]; then
echo Time passed
load=`uptime|cut -d "," -f 4|tr -d " ."`
echo Load $load

if [ $load -lt $maxload ] ; then
echo Load low enough

#Uncomment to display a message when updating
# run-standalone.sh dbus-send --type=method_call\
--dest=org.freedesktop.Notifications\
/org/freedesktop/Notifications\
org.freedesktop.Notifications.SystemNoteInfoprint\
string:"Updating e-mail..."
#Make sure connection is open
run-standalone.sh dbus-send --system --type=method_call\
--dest=com.nokia.icd /com/nokia/icd com.nokia.icd.connect\
string:"[ANY]" uint32:0
sleep 10
#Sync
run-standalone.sh dbus-send --type=method_call\
--dest=com.nokia.asdbus /com/nokia/asdbus\
com.nokia.asdbus.syncEmail
date
date +%s > /tmp/prevmail.tmp
fi
fi

torstai 17. kesäkuuta 2010

Configuring the power button menu

To start or focus an application in N900, you can simply hit the bottom right corner (if in full screen mode), hit the top left screen some times to get to app list/desktop/task manager, scroll to the correct desktop page or position in app list if needed, find the correct icon and tap it. Unless, of course, you happen to have a full screen Debian app where you'd open the keyboard and type Ctrl+space first, or some unresponsive app that won't react to the bottom right corner app where you'd, well, wait and hope the situation isn't over when you get there. What could be easier?

Found that sometimes a bit difficult while biking and was looking for better solutions. One major enhancement being mapping the camera focus button to the task manager/dashboard with camkeyd/shortcutd, that made one handed task switching a lot easier. Then I was looking at the etc/systemui/systemui.xml file to add a reboot entry in the menu and noticed actually any function can be added so there I had the quick menu I had wished for:


Instructions for creating menu entries I have already written to Maemo Talk here so I'll not replicate them here, lets have this entry just a pointer there.

keskiviikko 16. kesäkuuta 2010

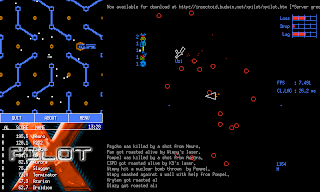
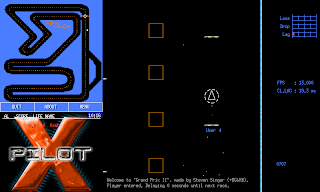
Running X-Pilot in N900


X-Pilot is one of my all-time favourites. Those were the times, having ten nationalities fighting each other when I spent a bit too many night hours in school X-terminal rooms..

After some years, it arrived to Windows.

Now, after some more years, it has arrived to my pocket. This article tells how to.


Installing Easy Debian

1. Install "Easy Debian" from app manager
2. Run "Deb Img Install" from app list
3. It'll ask where to store a big image file, choose anything you like.

Installing X-Pilot
1. In the application list, run "Debian chroot"
2. apt-get install xpilot-ng

Running X-Pilot (local)

1. Open two (one to use an external server) Debian chroot XTerms by the "Debian chroot" icon in the application list.
2. In both (or the only one) of them, enter "su user" to use a normal user instead of root.
3. Run "Set Deb HW Keys" in the application list. This allows changing to full screen in Debian apps.
4. In one of the XTerms, type /usr/games/xpilot-ng-server (not needed for external servers)
5. In the other one, type /usr/games/xpilot-ng-x11
6. Hit "Local" for local server or "Internet" for external servers. Hit any "Join" button to use local server or select any of the Internet servers.
7. Type Ctrl+Space to change to full screen.
8. Kill all enemies.

The default keymap isn't that well suited for N900 so will need to be modified. In X-Pilot, select Menu->Config->Save configuration (some hits on More in between) to create a template ~/.xpilotrc file with commented key mappings. Uncomment the lines you want (be sure to not leave any spaces before the entries) and add suitable button codes.

Control by tilting the device might be a decent mouse substitute (not that easy to control three dozen controls by two thumbs, and that's all you can use really), that might be possible with Accelemymote if XPilot can be configured to read a joystick, or by translating accelerometer values to mouse moves.

Desktop Command Execution Widget

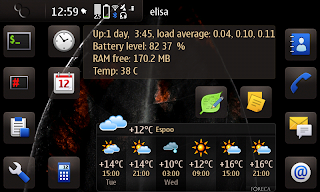
Desktop Command Execution Widget - All the information you need on your desktop.

My script with uptime, CPU load, battery level (or two, see below), RAM free and (battery) temperature:Battery level is here presented by the normal way and with the bq27x00-battery module that comes with the Power Kernel, neither of which seems to be very close. Actually, the average might be pretty good. Even more unreliable they are while charging, like in the image.

Also the temperature display needs the Power Kernel.

The script:
echo -n "Up:";uptime |cut -d " " -f 4- ;
echo "Battery level: `lshal|grep percentage|tr -s " "|cut -d " " -f 4|sort -n|head -1` %";
awk '/mT/ {memttl = $2}; /mF/ {memfre = $2}; /Bu/ {membff = $2}; $1 == "Cached:" {memcch = $2} END {printf ("RAM free: %.1f MB\n",(memttl-memfre-membff-memcch)/1024)}' /proc/meminfo;
echo Temp: `cat /sys/class/power_supply/bq27200-0/temp`

How to:
1. Install Desktop Command Execution Widget using app manager
2. Touch the desktop background, then the gear icon
3. Desktop menu -> Add widget
4. Desktop Command Execution Widget
5. Touch the wrench icon on the new widget that initially shows time and uptime
6. Add Cmd
7. Title="Show all" or whatever you like, script cut'n'paste as above, Save
8. Configure the settings:
- Select the saved command with the "Commands" button, if not already selected
- Width = 0.60(adjust if needed)
- Height = 4.3 (adjust if needed)
- Uncheck "Display Title" (just takes space)
- Check all the "Update" checkboxes
- Update interval = 1 minute, for example
- Network presence = Disabled
9. Save, Done

You should now see the display as in the image above. Only one battery level display and no temperature unless the bq27x00-battery kernel module is loaded.

How to enable the battery kernel module:
1. Install "Enhanced Linux kernel for power users" and "Enhanced Linux kernel for power users (settings)" with app manager
2. Open X-Term with user root
3. Create this file:
/root/startup.sh:
#!/bin/sh
modprobe bq27x00-battery

3. chmod u+x /root/startup.sh
4. Run that file as root. Needs to be run every time the device is restarted, I do it by hitting the "root XTerm" icon on my desktop and "./st" but could of course be added to startup scripts.